★ Getting Started ★

The following is a beginner's guide to building an antweight (1 pound) combat robot.
Keep in mind that this is just a simple guide. If you are looking for more advanced guidance, take a look at the "Further Reading" section at the bottom of the page. Also, remember that there is no "right way" to build a bot.
If you're feeling bold, feel free to experiment, innovate, and try out new ideas! But if it's your first time building, we recommend the KISS rule (Keep It Simple, Stupid).But don't let that discourage you from trying new things, after all, the most important rule is to have fun!
As you explore the world of combat robotics, you'll encounter countless different types of robots, weapons and strategies. All of which are of course made of of different materials, with different techniques, and different components. It's a lot to take in. So let's start with the basics.
★ The Basics ★
So how does the sport of combat robotics work? Basically, 2 radio-controlled robots enter the arena with one goal in mind: Destroy the enemy. Competitors will have 3 minutes to ram, cut, slice, pierce, and burn their enemy to the best of their ability.
Victory can be achieved in 4 different ways.
The enemy is knocked out
The enemy is knocked out when it is unable to show controlled, translational movement for 10 seconds. This includes being flipped upside-down (even if the wheels can still spin). Make sure your bot can drive upside-down, or has some way to get itself back on its feet! Once a bot appears to be knocked out, a judge or announcer will start a countdown from 10. If the robot doesn't move in time, the fight is over and they lose.
The enemy taps out
A tap-out occurs when the enemy decides to surrender. Usually this is because they do not want their robot to be damaged further or an expensive component is exposed. This is a very viable option in double-elimination tournaments because you still want your bot to able to fight next time!
The enemy is pushed out
If the arena has a pit or gaps in the wall, it is possible to "push out" the enemy. This is also known as going OOTA (Out Of The Arena). If the arena you are competing in has these hazards, be careful! Falling into a pit or being knocked out of the arena is an immediate loss.
A judges decision
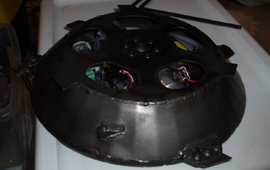
After the 3 minutes are over and both bots are still standing, the designated event judges will decide who the victor is. The criteria is usally composed of 3 factors: Damage, Aggression, and Control. So be sure to demonstrate these 3 tactics during your fight!
★ Rules ★
There are a few rules to keep in mind when designing, and operating a combat robot. These rules are essential for fun and safe competitions.
There are a few rules to keep in mind when designing, and operating a combat robot. These rules are essential for fun and safe competitions.
Keep in mind that the following just cover a broad definition of the rules.
For a more detailed guide, take a look at the various SPARC Rules and Guides
Rules also vary from event to event. It is essential to check the specific rules of each event you go to as there may (will) be differences.
[ARC event-specific rules will be posted soon.]
Illegal Weapons
The following weapons are illegal and can not be used on your robot.- Projectiles
- EMP's
- Liquids
- Electricity
- Vision Obscuring (Smoke bombs, strobe lights, etc)
- Entanglement Devices (Nets and rope)
- Explosives
Pins and Holds
A pin occurs when a bot holds an enemy bot against a wall for a long period of time. After 10 seconds, the pined bot must be released. A pin will then be scored for the "pinner" and can factor into their aggression and control points.
A hold occurs when a bot holds an enemy bot in the air for a long period of time. After 30 seconds, the held bot must be released. Just like pinning, scoring a hold will also give you more points in the judges' decision.
Time
Matches last for 3 minutes. After the time is up, it is important for both competitors to stop their bots. Do not attempt to hit the enemy after the match is over. Simply let go of the controls and switch your weapons off.★ Types of Combat Robots ★

★ Parts ★
Building Materials
McMaster-Carr is a fantastic resource for finding raw buliding materials and basically anything hardware-related.
FingerTech Robotics is another great resource, especially for titanium.
In antweight combat robotics, all of the commonly used materials can be found on McMaster-Carr, or your local hardware store.
- Aluminum - Baseplates, armor, top-plates, mounts
- Titanium - An overall great material that is lightweight and tough! Used in baseplates, armor, and weapons.
- Garolite - Used in baseplates/top-plates when aluminum is too heavy
- 3D-Printed Plastics - If you have access to a 3D-printer, many robot chassis are made out of plastics like ABS and nylon.
- UHMW (Ultra-High Molecular Weight Polyethylene) - Armor, frames, and even weapons occasionally
3D-Printing
3D printed parts and even entire chassis frames are common with combat robots.
Depending on your application, there are several different filaments to consider including (but not limited to): PLA, ABS, PLA+, Nylon, NylonX, and Onyx.
Filaments like ABS, PLA+, and Nylon can be used as chassis material especially in 150g classes, but depending on the design, may not be as useful as UHMW or metal.
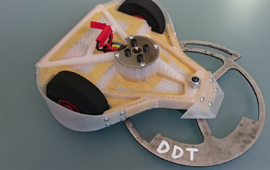
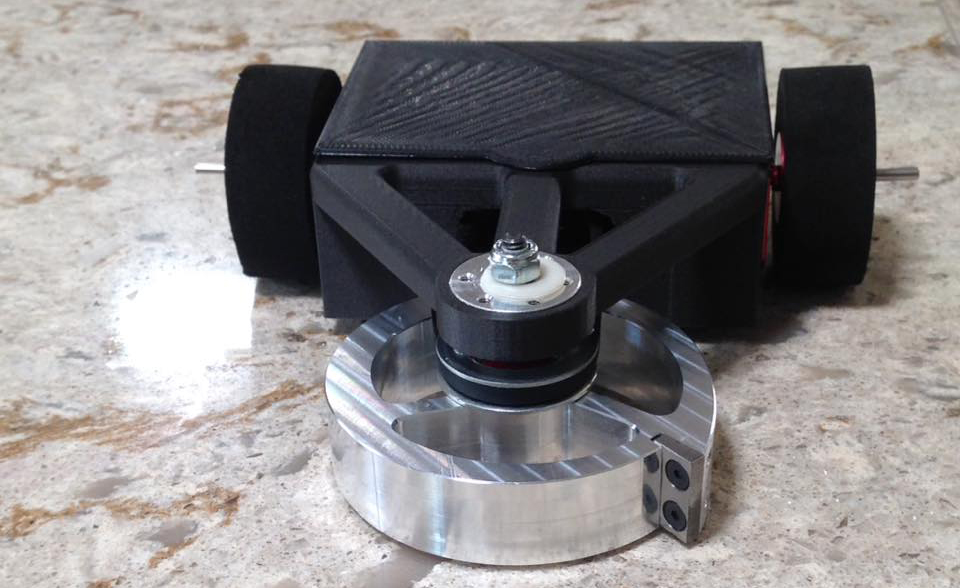
Lastly, filaments like NylonX and Oynx make for great chassis materials as they are lightweight and strong. These filaments contain strains of carbon fiber mixed with the plastic to create an even stronger material.
Odium, built by David Rush (pictured to the right), uses a strong, yet lightweight Onyx frame to support its deadly weapon.
If you don't own a 3D-printer, there are several services online that can print your design for a fee. For a strong Onyx print, we recommend the services of EndBots.com's 3D Printing Service. Their service is fast, accurate, and simple... all for a low price! Simply send them your .stl file (Which you can export from CAD software like Fusion 360) to receive a quote, pay the amount, and you'll have your print in just a few days! Visit their website for more details.
Batteries
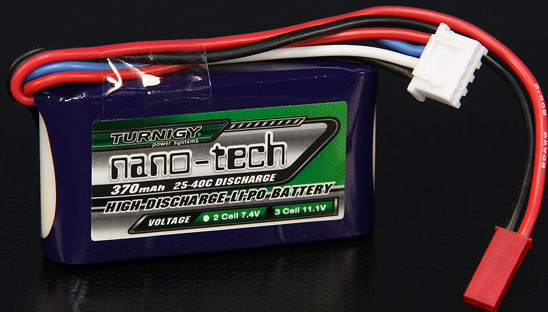
Most batteries in antweight robots are LiPo's because they are compact and light. LiPo stands for "lithium polymer", which is the chemical composition used. LiPo batteries come in different cell counts and capacities. Antweights typically use a 3s (which means "3 cells") LiPo battery. Each cell of a LiPo battery is 3.7 volts, so a 3 cell LiPo is 11.1 volts!
The next factor in determining which battery to pick is its capacity, which is measured in maAh (milliamp hours). So if a battery is 200mah, it could suppy power to a 200 milliamp system for an hour, or a 2 amp system for .1 hours (6 minutes).
Robots like spinners and drums will need a higher capacity than robots with wedges or flippers. 200-450mAh are the most commonly used capacities. The key is to be able to have enough battery life to make through the end of the match without adding too much weight. The Torque / Amp-Hour Calculator on the Sparc.tools website can assist you in calculating how much capacity you'll need in a battery.
It is important to not let the voltage of your battery drop below 9.5 volts. Doing so may damage the battery and it may be impossible for it to be fully charged again. There are a large number of battery chargers out there. Just make sure it supports LiPo's and the number of cells your battery uses. Some chargers will automatically stop once the battery is fully charged, but it is important to make sure you do not over-charge your battery, which may result in a fire.
Batteries like the Zippy Compact 3s 500mAh or the Turnigy Nano-Tech 3s 370mAh are both great examples. Another option is to use HobbyKing's LiPo Search Tool to find the perfect battery for your robot.
Drive
There are lots of different drive systems in combat robotics. They range from simple 2-wheel drive systems to walkers, to propellers!
In this guide we will focus on two of the most common motors and mounts used in simple wheeled drive systems: Micro gear motors and FingerTech SilverSpark motors. Both of these products are "gearmotors." A gearmotor is simply a motor with a gearbox. The gearbox is used to adjust the torque and the speed of the motor's output. The "ratio" of the gearbox determines how the speed and torque will be adjusted. For example, a 50:1 gearbox will spin its output shaft once for every 50 spins of the input shaft. This makes the motor spin 50x slower, but also provides 50x more torque. So to compare the 50:1 ratio to the 30:1 ratio, which has more speed and which has more torque? That's right! The 30:1 will have a faster speed and the 50:1 will have more torque!
Micro Gear Motors
Many antweights (like Dead Air pictured to the right) use these micro gearmotors because they are light-weight but still give your bot some great maneuverability. They are sold by both Pololu and ServoCity, as well as several other websites. They come in a variety of gear-ratios, but we recommend using the 30:1 or the 50:1 versions. You can mount these motors to your bot very easily with the use of Pololu's brackets and choose from a wide selection of wheels on Pololu's website as well.
One thing to keep in mind while using these wheels is that the treads can slip off of the hub if pushed sideways too hard. To remedy this, we recommend gluing your treads on.
Another potential issue with the wheels is that as they get larger in diameter, they do not get much thicker. So if you use large, thin wheels make sure they're not exposed! Otherwise a spinner may cut through the thin plastic hub.
The positive to using these wheels however, is that they are very light!
FingerTech SilverSpark Motors
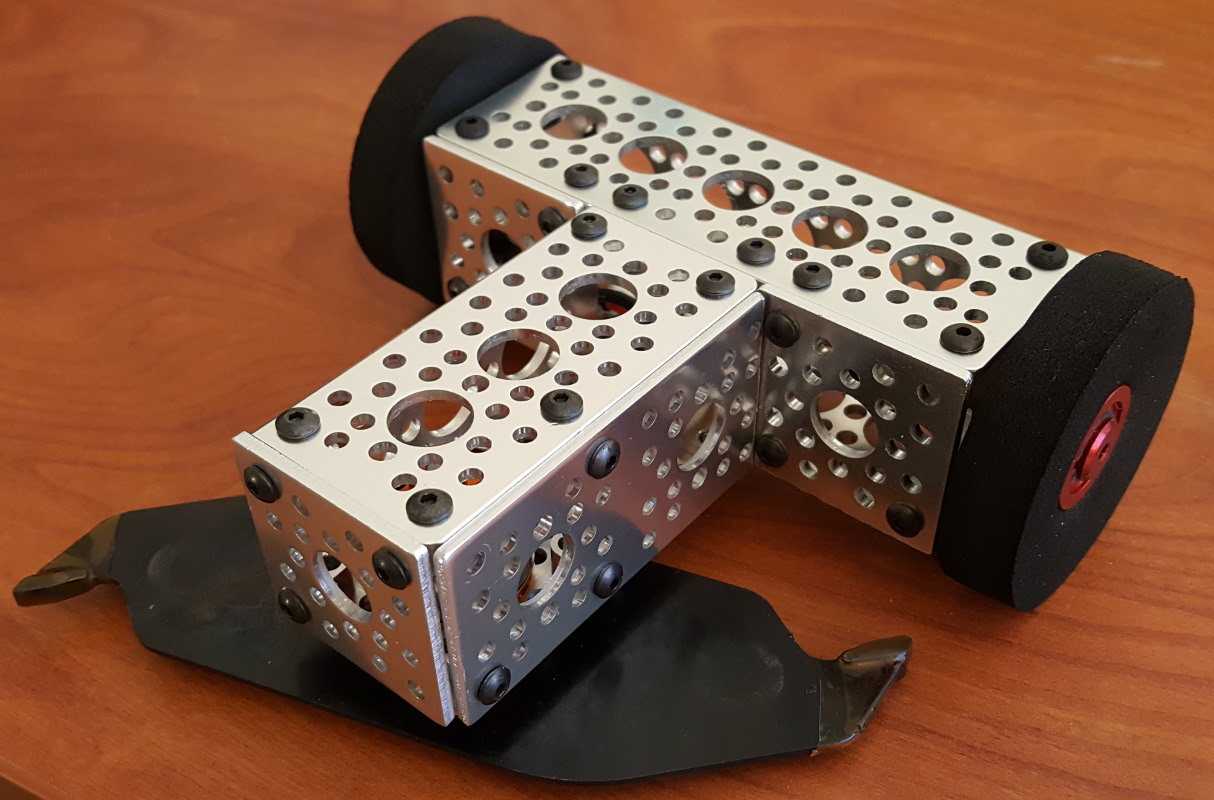
Another one of the most commonly used gearmotors is FingerTech's Silver Spark Gearmotor Once again, we recommend the 30:1 or the 50:1 ratios. FingerTech also sells a variety of Wheels and Mounts for the Silver Spark on their site. It's also common to drill big holes in the frame and simply glue the motors in place to secure them.
The wheels are made of a quite grippy foam. Instead of snaping like the Pololu hubs when impacted by a spinner, these wheels will simply chip and small chunks will be cut out. While your wheel won't be completely disabled, you'll need to make sure you have plenty of spares with you incase too much of the wheel is chopped off ;). Pictured to the left is "Angry Erector Set" which not only uses these FingerTech motors and wheels, but is constructed entirely out of ready-to-use parts!
These motors cost more than the mico gearmotors, but this is because they are more powerful. But at the cost of more power comes more weight. So choose the right kind of motor based on your robot's specific weight, power, and motor count needs!
Electronic Speed Controller (ESC)
So your robot has motors, but how does the robot know how to take input from your transmitter and make the motors act accordingly? Well that's exactly what ESC's do. They will take an input from your robot's receiver and feed the correct speed and direction into your motors to make the robot move!
We recommend using Vex Motor Controller 29's aka the "Vextroller. These ESC's are super cheap and light; perfect for an antweight! Their specs claim that 8.4 volts is their max, but these controllers can be pushed to 11.1 volts easily for an antweight. The only issue is that we can't feed 11.1 volts into our receiver without frying it. But luckily, with a bit of splicing, we can feed power into our Vextroller directly from our battery and power the receiver using a BEC. Jamison Go has written an excellent article on his blog that covers how to achieve this.
Another more expensive option is FingerTech's TinyESC which is even smaller than the Vextroller! With the added cost comes the addition of a Battery Eliminator Circuit (BEC) that can be used to power the receiver.

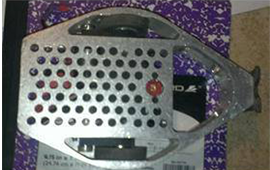
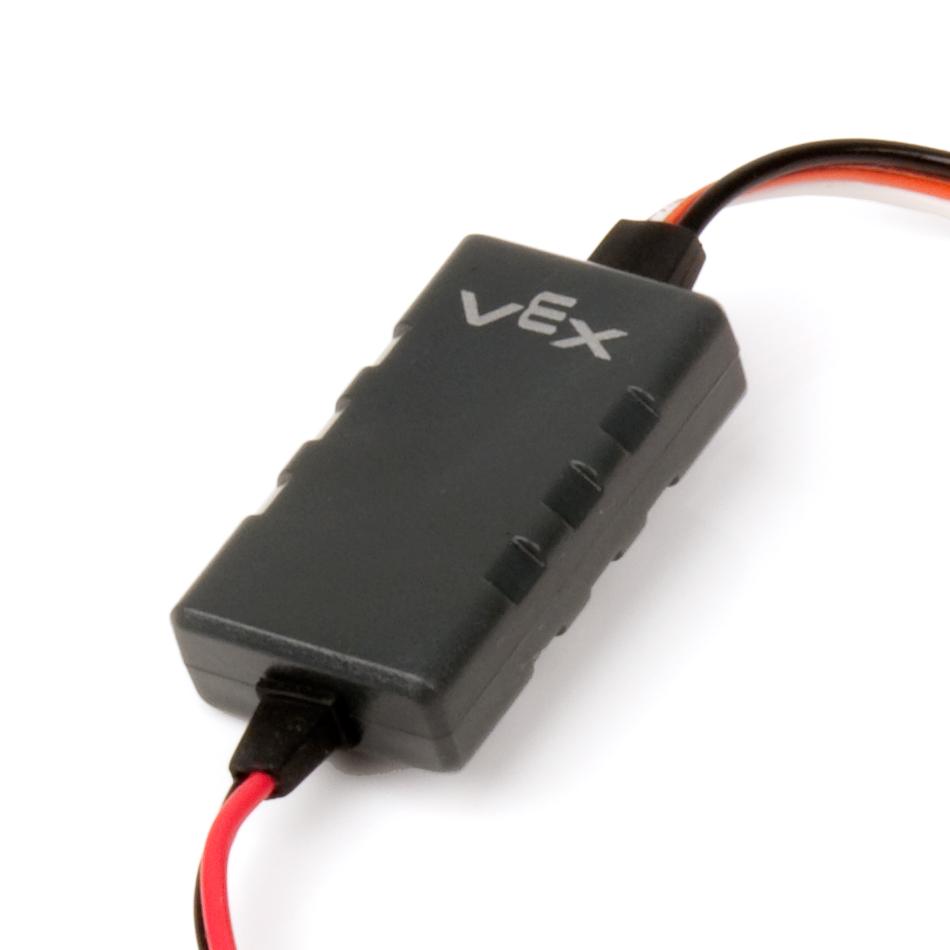
A fairly common practice is to use a dual ESC (DESC). A DESC is a single board that uses 2 inputs and controls 2 outputs (often with built in mixing and BEC's). Some successful examples include the Scorpion Mini ESC sold by BotKits.com as well as the Endbots DESC (pictured to the left).
When deciding which ESC/DESC is right for you, keep these things in mind:
Transmitter and Receiver
So you need a way to control your robot. The standard for modern combat robotics is to use a 2.4 Ghz radio transmitter and receiver, also known as a tx and rx respectively. Hobbyking's tx/rx set is very cheap and good for beginners at only $25. Another good option is the FlySky FS-I6, which comes with a lot more features and a built-in menu system at $50.
If you wish to steer the robot with only 1 joystick, instead of using trank-style controls (left joystick controls the left wheel, right joystick controls the right wheel), you will need to make sure your transmitter is capable of elevon mixing.
It is also important to remember that not all 2.4GHz tx's and rx's are compatible with each other. Some use different protocols, or even only work within their own brand name.
★ Designing A Combat Robot ★
When beginners first try their hand at building a combat robot, there are a few common mistakes to avoid. The first being to try to build a robot with a design that's too complicated. It is recommended to build a wedge or a flipper for your first bot, and then work up from there. Another big mistake is to procrastinate on getting started. Building a robot takes time, you have to wait on parts arriving, components breaking or having to be replaced, redesigns, and a plethora of other "gotchas" that sneak up on you before the competition date.
Many people think that you need a great deal of money to get into combat robotics. New builders can also be intimidated by all of the robots they see built using state-of-the-art technology like 3D-printers or CNC machines. Well that's not the case, especially for antweights. You can build a decent antweight for about $100!
When designing your robot, using computer aided design (CAD) software can greatly aid you in the design process and prevent future mistakes from occurring. We recommend using Fusion 360 by AutoDesk. It is free for everyone, not just students. AutoCAD and SolidWorks are also great options if you are willing to drop the cash or have connections through work or school to obtain a licence. Though CAD is encouraged and fun to learn, it is not needed to make a robot. There's always good ol' pencil and paper!
As a perfect example of these points, let's take a look at the Krave Monster below, built by Carter Hurd. This robot wasn't designed using any CAD software, doesn't break the bank, doesn't use any CNC or 3d-printed parts except the wheels (which would easily be replaced with something store-bought.), and it was able to take 1st place at BotBrawl 2016! It just goes to show, you don't need money or fancy equipment to become a champion. All you need is a little creativity!
★ Video Tutorials ★
Robert Cowan's Antweight Tutorial Series
Robert Cowan has put together an excellent 3-part series of videos on his antweight "Sgt Cuddles." These videos will show you the basics how a combat robot works as well a bit more detail on how each component functions.
If you like his vidoes, and would like to help him make more, consider becoming a patron and Join Robert's Patreon
★ Further Reading ★
Websites For Buying Combat Robot Parts
- FingerTech Robotics
- HobbyKing
- ServoCity
- Pololu
- McMaster-Carr
- The Robot MarketPlace
- RobotShop
- Sparkfun
- KitBots
- BotKits
- Endbots
Advanced Guides
This guide just barely scratches the surface of combat robotics. If you're looking for some more detailed guides, the two guides below are very well written and provide fantastic information.